-
(파이썬 증권데이터 분석) 장고 웹서버 구축 및 자동화computer_IT 2022. 7. 24. 14:44반응형
2022.07.24 - [computer_IT] - (파이썬 증권데이터 분석) 삼중창 매매, 듀얼 모멘텀 투자
(파이썬 증권데이터 분석) 삼중창 매매, 듀얼 모멘텀 투자
2022.07.23 - [computer_IT] - (파이썬 증권데이터 분석) 볼린저 밴드 지표 (파이썬 증권데이터 분석) 볼린저 밴드 지표 2022.07.22 - [computer_IT] - (파이썬 증권데이터 분석) 일별시세 DB구축 및 시세 조회 AP..
lifenlight.tistory.com
파이썬 웹 프레임워크로는 장고와 플라스크가 가장 유명하다. 장고는 대규모 웹 사이트 개발하는 프레임워크이고 플라스크는 마이크로프레임워크를 표방하기 때문에 가볍고 간결하다. 장고에서는 웹 개발시 공통 기능들이 패키지로 제공되기 때문에 사용하기만 하면 되지만 플라스크는 패키지가 부족해 필요한 기능을 구현해야 하는 불편함이 있다.
장고는 pip install django로 설치하고 개발할 폴더에 가서 django-admin startproject 프로젝트명 을 입력하면 프로젝트가 생성된다. 여기서는 Investar 프로젝트를 생성한 후, Investar 폴더로 이동하여 python manage.py runserver로 웹 서버를 실행한다. 그리고 웹 브라우저에 localhost:8000으로 접속하면 다음과 같은 페이지가 표시된다.
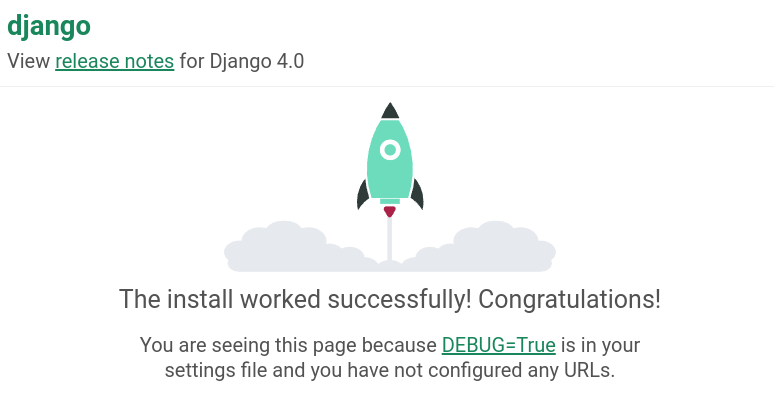
장고 설치 성공 페이지 기존 웹 프로그래머들은 SQL을 이용하여 데이터베이스에 접근했지만, 장고는 models.py파일에 모델 클래스를 정의하면 이에 대한 매핑 테이블이 데이터베이스에 자동으로 생성된다. 장고에서는 웹 사이트를 프로젝트 단위로 구분하고 프로젝트를 구성하는 모듈화된 프로그램들을 앱(애플리케이션)이라고 부른다. 앱이 모여 프로젝트가 되는 셈이다.
이제 Investar 프로젝트에 hello 앱을 생성해보자. python manage.py startapp hello 명령을 입력한다. 앱을 생성하면 setting.py 파일에 앱을 추가하고 데이터베이스에 변경 사항을 반영해야 한다.
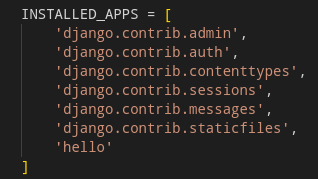
setting.py 파일에 앱 추가하기 데이터베이스에 변경 사항 반영은 python manage.py migrate 명령을 입력한다. 그리고 urls.py 파일을 열어 수정한다.
"""Investar URL Configuration

The `urlpatterns` list routes URLs to views. For more information please see:
    https://docs.djangoproject.com/en/4.0/topics/http/urls/
Examples:
Function views
    1. Add an import:  from my_app import views
    2. Add a URL to urlpatterns:  path('', views.home, name='home')
Class-based views
    1. Add an import:  from other_app.views import Home
    2. Add a URL to urlpatterns:  path('', Home.as_view(), name='home')
Including another URLconf
    1. Import the include() function: from django.urls import include, path
    2. Add a URL to urlpatterns:  path('blog/', include('blog.urls'))
"""
from django.contrib import admin
from django.urls import path, re_path  # RE-path 추가
from hello import views  # 추가(Function views 방식)

urlpatterns = [
    path('admin/', admin.site.urls),
    re_path(r'^(?P<name>[A-Z][a-z]*)$', views.sayHello),  # 추가
]
re_path() 함수를 사용하면 정규표현식을 사용해 URL 패턴을 처리할 수 있다. [A-z][a-z]* 는 첫 글자가 반드시 대문자이고 이후는 소문자가 나오거나 없는 경우이다. 이 패턴과 매치되는 영문 이름을 name 파라미터로 뷰에게 넘겨주라는 의미다.
주요 정규표현식
표현 의미 동일한 표현 ^ 문자열의 시작 $ 문자열의 끝 x | y x나 y [abc] 괄호 내부에 있는 개체 중 한 개. a, b, c 중 하나 [a-c] [a-z] 영소문자 중 한 개 [^a-z] 영소문자를 제외한 개체 한 개 {n} n번 반복 {m,n} 최소 m번에서 최대 n번까지 반복 * 0번 이상 반복 {0,} + 1번 이상 반복 {1,} ? 0번 또는 1번 반복 {0,1} \s 공백 한 개 \S 공백이 아닌 개체 한 개 \d 숫자 한 개 [0-9] \D 숫자가 아닌 개체 한 개 [^0-9] \w 영문, 숫자, 밑줄(_) 중 한 개 [a-zA-Z0-9_] \W 영문, 숫자, 밑줄(_)이 아닌 개체 한 개 [^a-zA-Z0-9_] 이제 Investar/hello/views.py 파일을 다음과 같이 변경한다.
from django.http import HttpResponse

# Create your views here.
def sayHello(request, name):
    html = "<h1>Hello, {}!</h1>".format(name)
    return HttpResponse(html)
python manage.py runserver로 로컬서버 실행 후 다음과 같이 접속하면 입력한 문자열이 표시된다.

Hello Django 애플리케이션 관리자 계정을 생성하려면 python manage.py createsupersuser 를 입력하여 사용할 이메일주소와 암호를 입력한다. 장고 관리자 페이지 localhost:8000/admin 에서 로그인할 때 사용한다.
애플리케이션이 단순할 때는 html코드를 작성해서 HttpResponse로 일일이 응답해도 괜찮지만, 복잡한 애플리케이션을 개발할 때는 html코드 부분을 템플릿 파일로 작성하고 동적인 데이터부분은 파이썬 코드로 개발하는 것이 효과적이다. 웹 접속시 최상위 index 앱을 생성해보자.
python manage.py startapp index로 생성 후 setting.py에 'index' 추가한다. 그리고 urls.py 파일을 열어 path 함수를 추가한다.
"""Investar URL Configuration

The `urlpatterns` list routes URLs to views. For more information please see:
    https://docs.djangoproject.com/en/4.0/topics/http/urls/
Examples:
Function views
    1. Add an import:  from my_app import views
    2. Add a URL to urlpatterns:  path('', views.home, name='home')
Class-based views
    1. Add an import:  from other_app.views import Home
    2. Add a URL to urlpatterns:  path('', Home.as_view(), name='home')
Including another URLconf
    1. Import the include() function: from django.urls import include, path
    2. Add a URL to urlpatterns:  path('blog/', include('blog.urls'))
"""
from django.contrib import admin
from django.urls import path, re_path  # RE-path 추가
from hello import views
from index import views as index_views  # 추가(Function views 방식)

urlpatterns = [
    path('admin/', admin.site.urls),
    re_path(r'^(?P<name>[A-Z][a-z]*)$', views.sayHello),
    path('index/', index_views.main_view),  # 추가
]
index 앱의 뷰에는 아직 main_view가 없으므로, index/views.py 파일을 열어 main_view()를 작성한다. 단순히 템플릿으로 사용할 index.html만 넘겨주는 역할을 한다.
from django.shortcuts import render

# Create your views here.
def main_view(request):
    return render(request, 'index.html')
index폴더 밑에 templates 폴더를 생성 후 템플릿으로 사용할 index.html 파일을 작성한다.
<html>
    <head>
        <title>This is title.</title>
    </head>
    <body>
        <h1>This is heading1 text.</h1>
        <h2>This is heading2 text.</h2>
        <h3>This is heading3 text.</h3>
        <p>This is a paragraph.</p>
        This is plain text.<br />
        <b>This is bold text.</b><br />
        <i>This is Italic text.</i><br />
        <s>This is strike text.</s><br />
        <ol>
            <li>the first orderd list</li>
            <li>the second orderd list</li>
            <li>the third orderd list</li>
        </ol>
        <ul>
            <li>unorderd list</li>
            <li>unorderd list</li>
            <li>unorderd list</li>
        </ul>
        <table border=1>
            <tr>
                <th>table header 1</th>
                <th>table header 2</th>
                <th>table header 3</th>
            </tr>
            <tr>
                <td>table data 4</td>
                <td>table data 5</td>
                <td>table data 6</td>
            </tr>
            <tr>
                <td>table data 7</td>
                <td>table data 8</td>
                <td>table data 9</td>
            </tr>
        </table><br />
        <a href="www.djangoproject.com">Visit Django homepage!<br />
        <img src="Django_Logo.jpg"/></a>
    </body>
</html>
이미지 파일은 index/templates 폴더에 함께 넣어둔다. 서버 실행후 localhost:8000/index에 접속하면 index.html이 표시된다.
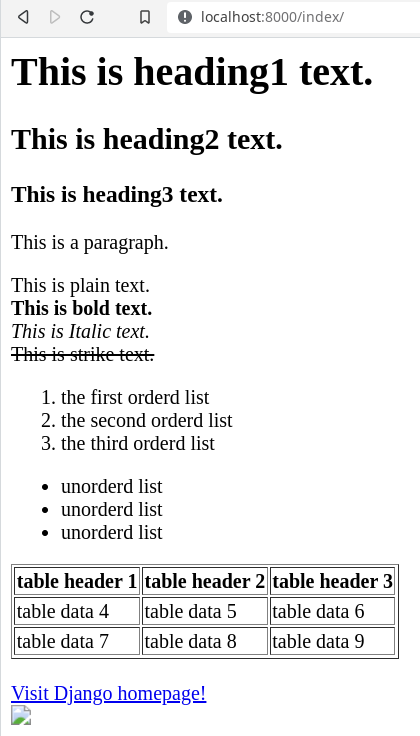
index.html 이미지가 표시되지 않는데 장고에서는 이미지 파일이나 css파일 등을 처리하려면 추가 작업이 필요하다. index 폴더 밑에 static 폴더 만들고 또 그 밑에 index 폴더를 만든다. 여기로 그림 파일을 이동한다. 그리고 index.html을 다음과 같이 변경한다.
{% load static %}
<html>
    <head>
        <title>This is title.</title>
		<link rel="stylesheet" href={% static "index/style.css" %} />
    </head>
    <body>
        <h1>This is heading1 text.</h1>
        <h2>This is heading2 text.</h2>
        <h3>This is heading3 text.</h3>
        <p>This is a paragraph.</p>
        This is plain text.<br />
        <b>This is bold text.</b><br />
        <i>This is Italic text.</i><br />
        <s>This is strike text.</s><br />
        <ol>
            <li>the first orderd list</li>
            <li>the second orderd list</li>
            <li>the third orderd list</li>
        </ol>
        <ul>
            <li>unorderd list</li>
            <li>unorderd list</li>
            <li>unorderd list</li>
        </ul>
        <table border=1>
            <tr>
                <th>table header 1</th>
                <th>table header 2</th>
                <th>table header 3</th>
            </tr>
            <tr>
                <td>table data 4</td>
                <td>table data 5</td>
                <td>table data 6</td>
            </tr>
            <tr>
                <td>table data 7</td>
                <td>table data 8</td>
                <td>table data 9</td>
            </tr>
        </table><br />
        <a href="https://www.djangoproject.com">Visit Django homepage!<br />
        <img src={% static "index/Django_Logo.jpg" %} /></a>
    </body>
</html>
스타일을 적용하기 위해 css파일(style.css)을 index/static/index 폴더에 넣는다.
/* 테이블 데이터와 테이블 헤더에 대한 스타일 지정  */
table td, table th {
    border: 1px solid #ddd;
    padding: 8px;
}

/* 테이블 행이 짝수 번째일 경우의 색상 지정 */
table tr:nth-child(even){background-color: #f2f2f2;}

/* 테이블 행에 마우스 커서를 올렸을 때의 색상 지정 */
table tr:hover {background-color: #ddd;}

/* 테이블 헤더에 대한 스타일 지정 */
table th {
    padding-top: 12px;
    padding-bottom: 12px;
    text-align: left;
    background-color: #4CAF50;
    color: white;
}
이제 서버를 실행하면 css 스타일이 적용되고 그림 파일이 정상적으로 나타난다.
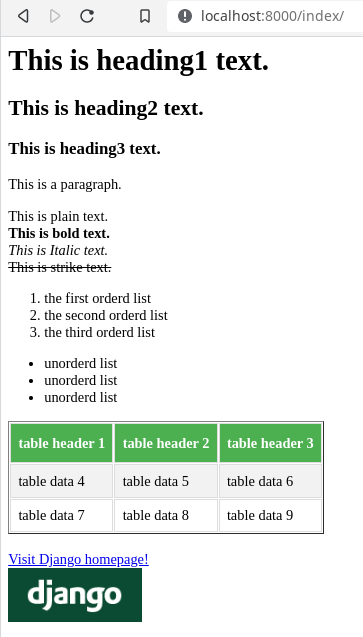
이미지가 표시된 인덱스 페이지 웹에서 주식종목, 주식수로 평가금액 확인하기
python manage.py startapp balance 를 입력하여 balance 앱을 생성한다. 그리고 setting.py에 'balance'를 추가한다. urls.py에 from balance import views as balance_views 과 path('balance/', balance_views.main_view), 를 추가한다.
네이버 증권의 주식종목 현재가는 https://finance.naver.com/item/sise.nhn?code=035420 과 같이 네이버종목 코드(035420)을 매개변수로 받는다.
balance폴더의 views.py 은 다음과 같다.
from django.shortcuts import render
from bs4 import BeautifulSoup
from urllib.request import urlopen

def get_data(symbol):
    url = 'http://finance.naver.com/item/sise.nhn?code={}'.format(symbol)
    with urlopen(url) as doc:
        soup = BeautifulSoup(doc, "lxml", from_encoding="euc-kr")
        cur_price = soup.find('strong', id='_nowVal')  # ① 현재가 추출
        cur_rate = soup.find('strong', id='_rate')  # ② 등락율 추출
        stock = soup.find('title')  # ③
        stock_name = stock.text.split(':')[0].strip()  # ④ 문자열 좌우 공백 제거
        return cur_price.text, cur_rate.text.strip(), stock_name

def main_view(request):
    querydict = request.GET.copy()
    mylist = querydict.lists()  # ⑤ GET방식으로 넘어온 딕셔너리 형태의 URL을 리스트로 변환
    rows = []
    total = 0

    for x in mylist:
        cur_price, cur_rate, stock_name = get_data(x[0])  # ⑥ 종목코드로 현재가, 등락률, 종목명을 가져온다.
        price = cur_price.replace(',', '')
        stock_count = format(int(x[1][0]), ',')  # ⑦ 천 자리마다 쉼표
        sum = int(price) * int(x[1][0])
        stock_sum = format(sum, ',')
        rows.append([stock_name, x[0], cur_price, stock_count, cur_rate,
            stock_sum])  # ⑧
        total = total + int(price) * int(x[1][0])  # ⑨ 평가금액 x 주식수

    total_amount = format(total, ',')
    values = {'rows' : rows, 'total' : total_amount}  # ⑩
    return render(request, 'balance.html', values)  # ⑪ balance.html에 값을 넘겨준다.
balance 폴더 밑에 templates 폴더를 만들고 balance.html 파일을 넣고, balance 폴더 밑에 static 폴더 만들고 또 그 밑에 balance 폴더를 만들고과 css 파일(b_style.css)을 넣는다.
{% load static %}
<html>
    <head>
        <title>Balance: {{ total }}</title>  <!-- ① -->
        <link rel="stylesheet" href="{% static 'balance/b_style.css' %}"/>
    </head>
    <body>
         <table>
            <tr>
                <th>종목명</th>
                <th>종목코드</th>
                <th>현재가</th>
                <th>주식수</th>
                <th>등락률</th>
                <th>평가금액</th>
            </tr>
            {% for row in rows %}
            <tr>
                {% for x in row %}
                <td>{{ x }}</td>  <!-- ② -->
                {% endfor %}
            </tr>
            {% endfor %}
            <tr>
                <th colspan=3>계좌 잔고</th>
                <th colspan=3>{{ total }}</th>  <!-- ③ -->
            </tr>
        </table>
    </body>
</html>
/* 테이블 폰트 및 테두리선 설정 */ table { font-family: Arial, Helvetica, sans-serif; border-collapse: collapse; } /* 테이블 데이터 및 테이블 헤더 설정 */ table td, table th { border: 1px solid #ddd; padding: 8px; } /* 테이블 행이 짝수 번째일 때의 색상 지정 */ table tr:nth-child(even){background-color: #f2f2f2;} /* 테이블 행 위에 마우스 컬러가 올려졌을 때의 색상 지정 */ table tr:hover {background-color: #ddd;} /* 테이블 헤더의 스타일 지정 */ table th { padding-top: 12px; padding-bottom: 12px; background-color: #4D92AA; text-align: center; color: white; } /* 테이블 데이터의 텍스트 정렬 방식을 지정 */ table td:nth-child(1){text-align: left;} table td:nth-child(2){text-align: center;} table td:nth-child(3){text-align: right;} table td:nth-child(4){text-align: right;} table td:nth-child(5){text-align: right;} table td:nth-child(6){text-align: right;}로컬 서버를 실행하고 localhost:8000/balance/?종목코드=종목수&종목코드=종목수 형식으로 입력하면 다음과 같이 표시된다.
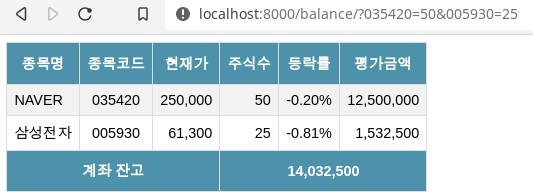
종목코드와 종목수로 평가금액 계산하기 2022.07.24 - [computer_IT] - (파이썬 증권데이터 분석) 슬랙으로 알림메시지 보내기
(파이썬 증권데이터 분석) 슬랙으로 알림메시지 보내기
2022.07.24 - [computer_IT] - (파이썬 증권데이터 분석) 장고 웹서버 구축 및 자동화 (파이썬 증권데이터 분석) 장고 웹서버 구축 및 자동화 2022.07.24 - [computer_IT] - (파이썬 증권데이터 분석) 삼중창 매매.
lifenlight.tistory.com
반응형'computer_IT' 카테고리의 다른 글
(파이썬 증권데이터 분석) 백트레이더를 활용한 백테스트 (2) 2022.07.24 (파이썬 증권데이터 분석) 슬랙으로 알림메시지 보내기 (0) 2022.07.24 (파이썬 증권데이터 분석) 삼중창 매매, 듀얼 모멘텀 투자 (0) 2022.07.24 (파이썬 증권데이터 분석) 볼린저 밴드 지표 (0) 2022.07.23 (파이썬 증권데이터 분석) 일별시세 DB구축 및 시세 조회 API 개발 (0) 2022.07.22